Wednesday, January 19, 2022

Spritz Cookies aka Spritzgebäck

A few years ago after Christmas, I treated myself to a cookie press. I only make cookies around Christmas, so I finally liberated it from its box to make Spritzgebäck--Spritz cookies--a German cookie so named because you shape them with a cookie press (or some other extruder).


Since I don't have a German mother, I consulted Frau Google for a good recipe. You'd think there wouldn't be that many, but there are and there are ever-so-slight differences that can have a huge effect on the final cookie. I settled on a combination of two recipes (from Betty Crocker and allrecipes.com) and pored over dozens of reviews. I'm happy to report that the cookies are good! Very good! I dare say this is the very best spritz cookie recipe!

A few tips for the first-time spritz-maker, though:
1.  Chill the cookie sheets before spritzing. Either in the refrigerator, freezer or outside (if it's cold and clean). I didn't chill my dough, just the sheet and I had no problems with the dough expanding out of shape or not sticking to the sheet well at all.
2.  Do not overdo it with almond flavor. I used an almond emulsion and it still borders on fakey taste. Almond is a tricky flavoring.
3. Think about lemon instead. I really like the lemon/vanilla ones I made a lot. But I love lemon cookies. LOVE. I also did an orange-cardamom combo that was okay, but not great.
4.  Use good butter. Kerrygold, Cabot, Organic Valley--these are all good butters. A locally-made butter is even better, particularly if it's fresh. Don't use butter that's been sitting around a while. Why? The butter flavor is the most prevalent in this cookie. If you don't use good butter, you'll know it.
5. You can use (less) regular sugar if you'd like, but the powdered sugar really creates a little pillow of a cookie that just melts in your mouth.
6.  Decorate with sprinkles beforehand by smoothing over a tiny bit of water to keep them in place. Or decorate after baking by dabbing the cookies with a little corn syrup first.
7. I actually divided the dough into quarters to experiment with colors and flavors. It was easy to dial back the amount of extract and food color and add in to the small batches. I just pressed the dough out on plastic wrap and dropped on the liquids and rolled it up and turned it until the flavor and color was consistent.

Spritz Cookies aka Spritzgebäck

yields about 6 dozen

1 cup butter, softened (2 sticks)
1 1/4 cups confectioner's sugar
2 1/2 cups all-purpose flour, sifted 
1/4 teaspoon salt (more if you use unsalted butter)
1 egg 
1 teaspoon vanilla extract
1/2 to 1 teaspoon lemon extract (or almond extract)
food coloring (optional)
sprinkles and colored sugar (optional)

Pre-heat oven to 400ºF. Beat butter and sugar in large bowl until creamy. Mix in the flour, salt, egg, extract and a food color, if desired (start with 2-3 drops and add more as needed).

Roll a portion of the dough into a log and insert into cookie press. Spritz desired shapes on a chilled, ungreased cookie sheet. Decorate with sprinkles and sugar.

Bake 6 to 8 minutes until set, but not brown. Immediately remove to cool on a wire rack. 

Decorating Sugar Cookies for Christmas

When Mini Eats was almost three, I thought that might be the year to start a tradition of decorating cookies. We were incorrect. I was ready, of course, but the little one wasn't quite sold on the concept of putting decorations on cookies without eating either of them.


The real news here, though is that this recipe is fantastic. My mom has a good recipe, but her cookies have always been crisp and crumbly (as she likes them). But I like a soft cookie. Searching the internet or even my books didn't seem like the right idea; for whatever reason, this detail is often omitted from descriptions. I need the cookie to be tasty and soft but also able to stand up to decorating. So I consulted Twitter, and--luckily for me--Lindsay of Love and Olive Oil responded with this sugar cookie recipe from Bake at 350. That's really all the endorsement I needed. I made the dough, rolled it out and made these wonderful cookies. They're perfect. They taste fantastic and are soft, but maintain their shape very well.


Normally, I would post the recipe, but I didn't make any changes to it and I have nothing to add (update: recipe follows)! I will say that this makes a lot of cookies. I'm not sure how many, exactly because I still have one-third? one-fourth? of the dough left in the freezer! Probably four or five dozen 3-4" cookies. And I didn't freeze my shapes and they turned out great. Click on over to her blog to get the recipe: http://bakeat350.blogspot.com/2008/04/taste-of-yellow-yellow-rose-sugar.html.


Vanilla-Almond Sugar Cookies

Ingredients:

3 cups all-purpose flour
2 tsp baking powder
1 cup sugar 
2 sticks (salted) butter, cold & cut into chunks
1 egg (or egg replacer, such as chia or flax seed)
3/4 tsp vanilla extract
1/2 tsp almond extract

Instructions:

Preheat oven to 350.

Combine the flour and baking powder, set aside. Cream the sugar and butter. Add the egg and extracts and mix. Gradually add the flour mixture and beat just until combined, scraping down the bowl, especially the bottom.

The dough will be crumbly, so knead it together with your hands as you scoop it out of the bowl for rolling.

Roll on a floured surface to about 1/4" to 3/8" thick, and cut into shapes. Place on parchment lined baking sheets and bake for 10-12 minutes. Let sit a few minutes on the sheet, then transfer to a cooling rack.

Black and White Cookies

Just before Father's Day, I asked Twitter to recommend some chocolate cookies for me to make for a gift. I got some great suggestions (Love and Olive Oil's Double Chocolate Chipotle Cookies, these Brown Butter Pecan Praline Oatmeal Cookies with chocolate chips and a chocolate glaze), but after I looked through Pinterest and saw a picture of black and white cookies, I couldn't get my mind off of them. After looking through the first recipe that popped up in my Google search, I was struck by how easy they seemed to be to make, too. How could a cookie as good as this be so easy? And if it's so easy, why aren't more bakeries making good versions of them? (Really, the ones I've had outside NYC were meh, at best.)


These cookies are a favorite in the Eats household. Mr. Eats and I "babymooned" in New York City and ate lots of potatoes, bagels, and black and white cookies. But they're only shaped like cookies; they're actually small, round, flat cakes (vanilla, sometimes with a hint of lemon) frosted with vanilla-lemon glaze on one side and chocolate glaze on the other side. And they're usually huge. Like, four or five inches wide.

Anyhoo, this recipe comes from Epicurious/Gourmet, which I trust, but I still read through several pages of reviews to get some tips. One of the best tips was to double the recipe because you are definitely going to want plenty of these cookies (the only part I didn't double was the amount of cocoa for the chocolate frosting). I used a large cookie scoop that yielded cookies that were about three to three and a half inches wide and I got an even three dozen. Enough to snack on for a while and to put some in the freezer for a nice treat at a later date. But I left the measurements of the original recipe.

Black and White Cookies
adapted from Gourmet/epicurious.com
yield: about 18 3" cookies
Please see the notes section at bottom before making these cookies.

For the cookies:
1 1/4 cups all-purpose flour
1/2 teaspoon baking soda
1/2 teaspoon salt
1/3 cup well-shaken buttermilk
1/2 teaspoon vanilla
1/3 cup (5 1/3 tablespoons) unsalted butter, softened
1/2 cup granulated sugar
1 large egg, room temperature

For the frosting:
1 1/2 cups confectioners sugar
1 tablespoon light corn syrup
2 teaspoons fresh lemon juice
1/4 teaspoon vanilla
1 to 2 tablespoons milk
2 to 4 tablespoons unsweetened Dutch-process cocoa powder

Preheat oven to 350°F.

Whisk together flour, baking soda, and salt in a bowl. Stir together buttermilk and vanilla in a cup.

Beat together butter and sugar in a large bowl with an electric mixer until pale and fluffy, about 3 minutes, then add egg, beating until combined well. Mix in flour mixture and buttermilk mixture alternately in batches at low speed (scraping down side of bowl occasionally), beginning and ending with flour mixture. Mix until smooth.

Spoon two-tablespoon-size dollops of batter about 2 inches apart onto a buttered large baking sheet. Dip fingers in a bit of water and tamp scoops down into a disk shape about 3/8" thick. Bake in middle of oven until tops are puffed and pale golden, and cookies spring back when touched, 15 to 17 minutes. Transfer with a metal spatula to a rack cool about 5 minutes.

Frosting:
Stir together confectioners sugar, corn syrup, lemon juice, vanilla, and 1 tablespoon milk in a small bowl until smooth. Transfer half of icing to another bowl and stir in 2 tablespoons cocoa, adding more milk, 1/2 teaspoon at a time, to thin to same consistency as white icing and more cocoa to taste.

Frost the cookies:
Turn cookies flat sides up, then spread white icing over half of each and chocolate over other half. Use a pointed knife to make a straight edge.

Let the frosting set completely before storing. Stack cookies on parchment in an air-tight container. Refrigerate after a few days

Notes:
1. Set the butter out overnight to soften. Cut it to size first!
2. Set out the egg about a half hour before starting to get it to room temperature, which will help with the texture.
3. For the buttermilk, I put 1 tablespoon of lemon juice in a 1/3 cup container and added milk until full.
4. Be sure to use plenty of butter to grease the cookie sheets. And it's better to overcook than undercook because the flat sides need to be firm so that they don't come up and crumble when you frost them.
5. When I doubled my recipe, I just made the frostings separately and substituted water for the lemon juice for the chocolate frosting so that it did not have any lemon flavor.
6. I did *not* double the recommended 1/4 cup of cocoa powder, which is why I suggest starting with 2 tablespoons and adding more if needed. I used Valrhona cocoa powder and the frosting was amazing. Use good cocoa powder if you can.
7. To frost the cookies, I used the pointy butter knife that came with my silverware and got a perfect edge with it. Be sure to spread in only one direction so that crumbs from the cookie don't get mixed into the frosting (so start with just a little bit and at the edge). If your white edge isn't perfect, don't worry; the chocolate will cover it up.

Egg-less Aquafaba Meringue Cookies

 Once in a while, I get the itch to try something new in the kitchen. I’d probably act on that itch a little more if someone else would clean up after me, but whatevs. I finally decided to give aquafaba meringues a chance after seeing them pop up on some vegan food blogs. I’m not vegan, but I do love a chance to try something interesting. I’m also not a huge fan of eggs (the traditional base for meringue), so this was a perfect experiment for me.


First: aquafaba. It’s just a fancy name for bean juice. You can make your own by soaking and cooking dried beans, but the easiest thing to do is to spend a buck on a can of chickpeas and drain the juice into a container. Any bean will do, but chickpea juice is a) nearly flavorless and b) nearly colorless. Cannellini or white beans are good alternative. A black bean meringue is probably going to be very bad and very ugly, though. Learn more about the science of aquafaba here.

Anyway, get y’self a can of chickpeas, drain the juice and then set aside the chickpeas for something else, such as hummus, lemony chickpea stirfry, roasted chickpeas, or just toss them into a salad as is.

You just put your ⅔ to ¾ cup of chickpea juice into your stand mixer bowl (gotta be a stand mixer for this challenge) with some cream of tartar (or arrowroot powder, if that’s what you have), whip, then add sugar (vegan sugar if you want it to be vegan) and flavor, whip some more and 15 minutes or so later, you’ve got meringue! It’s that easy. And super safe to eat without cooking. Here’s the recipe I used that was based on one from The Kitchn, though I’ve made some notes and also filled in some steps that they missed.


Aquafaba Meringue Cookies
yields 4 to 6 dozen cookies, depending on size

Ingredients

¾ cup aquafaba (the juice from 1 15oz can of low-sodium garbanzo beans/chickpeas

¼ teaspoon cream of tartar or arrowroot powder

½ cup granulated sugar

1 teaspoon vanilla extract (or other flavor--see notes)

Arrange 2 racks to divide the oven into thirds and heat to 200°F. Line 2 baking sheets with parchment paper and set aside.

Place the aquafaba in the bowl of a stand mixer fitted with the whisk attachment. Add the cream of tartar and beat on medium speed until very foamy, about 3 minutes.

While continuing to beat, gradually add in the sugar (about a tablespoon at a time so it is fully dissolved) and vanilla. Once all the sugar and flavor has been added, increase speed to medium high (I put it on 7 on my KA mixer). Beat until glossy and to stiff peaks, about 7-10 minutes longer. You can stop and check for stiff peaks with a spatula. When you scoop a bit out and hold it upright, it should maintain its shape instead of falling.

Transfer the meringue to a piping bag fitted with a star piping tip. Pipe the meringue onto the lined baking sheets into 1-inch rounds (and 1-inch or so high). You can also scoop the meringues onto the baking sheets in tablespoon rounds or use a sandwich bag with the corner cut off.

Place both sheets in the oven (or you can do one at a time). Bake until completely dry to the touch, about 1 hour. Larger meringues with require 1 to 1 1/2 hours.

Remove the meringues from the oven and cool completely before using or storing.

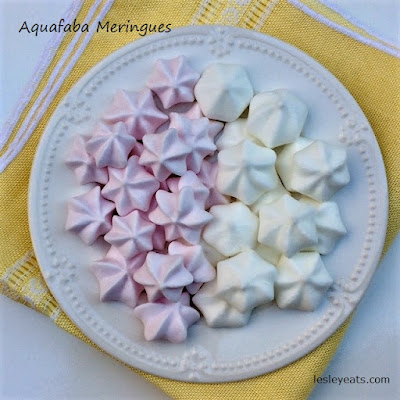
Notes: You might be tempted to use almond. I did that and I don’t recommend it. The flavor doesn’t bake out right at the lower temperature, so it retains some of that metallic almond taste that’s so common in almond emulsions and extracts. YMMV. To save the almond ones I made, I added a bit of cherry-flavored Stur, which made them tolerable. They’re the pink cookies in the photo.

For a second batch, I used a ½ teaspoon of lemon extract and a ½ teaspoon of vanilla and I *loved* that flavor. But, as you can tell from the photo, I didn’t whip them long enough, so they did not retain their shape as well. That’s really the only issue with not getting the stiffest peaks: not keeping their shape. They still tasted great.

Also, try to use two baking sheets at a time if you can. After an hour of sitting in the fridge, the leftover meringue needs to be whipped again to stiffen up and over-whipping may make it break down. That is true for eggs, at least. I didn’t really have that problem, but it was a concern.

You can also make thicker and bigger cookies and they’ll have a bit of a marshmallow texture on the inside. Try it, you might like it.

Another cool thing is that a ½ cup of sugar only has 387 calories, so even a small yield of 4 dozen cookies (I actually ended up with something like 8 dozen because mine were small), they calorie count is very low. You’re eating mostly flavored air. You can also use aquafaba to make a meringue topping or a pavlova. Pretty cool!

Chocolate Gingerbread Men

 Chocolate gingerbread men? Oh, yeah. Chocolatey, gingery, tasty.


When Mini Eats was in pre-school, her class was going to decorate gingerbread men for a Christmas project. Having signed up for my part a little too late, all that was left was to provide the cookies to decorate. I don’t love making rolled cookies, but I signed up anyway, particularly when the teachers helpfully suggested buying them in a kit or at the grocery bakery.

But when I saw the kit and bakery cookies, I decided they wouldn’t do. Most cookies were too small and delicate, I thought for two- and three-year-olds to handle. So I went in search of a cookie recipe that would make a cookie that was firm but not crispy (so it wouldn’t break when handled roughly or dropped—no tears, please!) and also tasty for a younger palate. My resulting baking science/Frankenrecipe actually turned out really well. In fact, I got several nice comments from the other parents who tasted the cookies their kids brought home.

The cocoa makes the gingerbread men a little darker and there’s just enough to taste it without overpowering the classic gingerbread flavor. But I did cut back on the spices so that the kids would like them, too. If you like a stronger, spicier cookie, just double the amount of spices.

I rolled these out to just over 1/8 of an inch and they rise just a bit to end up just under a 1/4 inch thick. Note that the dough is pretty stiff and dry--that's because I wanted them to be firm but not crispy and crumbly. They’re soft and chewy, but hold their shape well. Most importantly, they’re delicious!

Chocolate Gingerbread Man Cookies
12-16 large gingerbread men

3 cups all-purpose flour
1/4 cup unsweetened cocoa
1 teaspoon baking soda
1/2 teaspoon baking powder
1/4 teaspoon salt
1/2 cup unsalted butter, at room temperature
1/2 cup sugar
1/2 cup brown sugar
3 teaspoons powdered ginger
2 teaspoons ground cinnamon
1/4 teaspoon allspice
1/2 teaspoon vanilla
1/4 cup molasses
1/4 cup maple syrup
1 large egg

In a large bowl, mix together the flour, cocoa, baking soda, baking powder, and salt. Set aside.

In a large bowl, beat the butter, sugars, ginger, cinnamon, allspice, and vanilla on medium speed until light and fluffy, about 2 minutes. Add the molasses, syrup, and egg and continue beating on medium speed for another 2 minutes.

Add in the dry ingredients to the mix slowly while beating on low speed until just combined.

Remove the dough, cover with plastic wrap and chill in the refrigerator for at least hour.

Line two cookie sheets with parchment paper.

Break off about a quarter of the dough, leaving the remaining dough in the refrigerator. Lightly flour a flat work surface and roll out dough to a thickness of about 1/8 inch.

Using your cookie cutter, press out the shapes as closely together as possible and place the cookies on the prepared cookie sheets, about 1 inch apart. Return scraps to the dough in the refrigerator. Take out another quarter of the dough, and continue rolling out and cutting until all the dough has been used.

Bake cookies at 350F for about 10 minutes until slightly raised. Transfer the cookies to a wire rack to cool. Decorate as desired.